Sunday, October 19, 2014

You are invited to our first Halloween Ghouls Gathering


This tutorial is written for those with knowledge of PSP
Supplies Needed:
Tube of choice: I'm using the wonderful art work of Alex Prihodko
You can purchase his work at PFD HERE
FTU Scrap Kit by Candy Treats HERE
Mask #41 by Gems HERE
Don't forget to leave a thank you when downloading
Xero Porcelin
Open blank canvas 700x700
Open leaf frame 2 - resize 110%
Open leave frame 3 and place on top of other frame
Open heart frame 4 - resize 90 and move below 2nd frame
Merge these 3 frames as 1 layer
Open flower frame 3 and arrange to left side
Duplicate and move down
Merge these as 1
Duplicate and mirror
Open flower frame - resize 110%
Arrange below red flower frame
Repeat the same as red flower
Apply Xero Porcelin
Place main tube in front of frame
Repeat Porcelin
I used the following:
Button glitter 4
Bleeding love gem 2
Heart element 5
Leaves 2
Love Ribbon
Diamond
Flower Stem 1
Flower Stem 2
Flower Stem 3
Hair Clip 2
Open paper of choice and apply mask
Add the Copyright and your License Number for the tube
Resize to your liking and save as PNG
This tutorial was created on October 19,2014 by Rhonda
Any resemblance to another Tag or Tutorial is purely coincidental
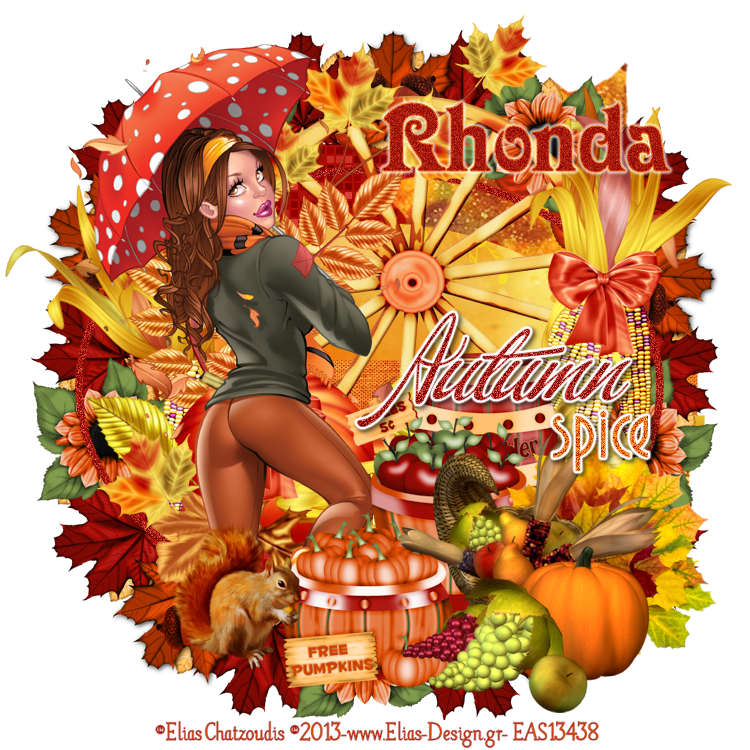
Saturday, October 18, 2014

This tutorial is written for those with knowledge of PSP
Supplies Needed:
Tube of choice: I'm using the wonderful art work of Keith Garvey
Which you must obtain a license to use HERE
PTU Scrap Kit by Chachaz Creations called Autumn Synfonie
You an purchase this awesome kit HERE
Mask #34 by Gems HERE
Don't forget to leave a thank you when downloading
Just place your elements where you want them
Open element 45 and place in center
I used this element to build my tag
I used the following:
Element 37
Element 39
Element 46
Element 47
Element 49
Element 50
Element 51
Element 52
Element 54
Element 56
Element 58
Element 59
Element 62
Element 65
Element 70
Open paper 2 and apply mask
Add the Copyright and your License Number for the tube
Resize to your liking and save as PNG
This tutorial was created on October 17,2014 by Rhonda
Any resemblance to another Tag or Tutorial is purely coincidental

This tutorial is written for those with knowledge of PSP
Supplies Needed:
Tube of choice: I'm using the wonderful art work of Danny Lee
You must obtain a license to use his art at S&Co HERE
PTU Scrap Kit from Bibi called "Thanksgiving Night" HERE
Mask of choice
Resize elements to your liking
This is a very quick and easy tutorial
Open blank canvas 700x700
Open element 94 & place in center of tag
I used this element to build my tag
I used the following:
Element 1
Element 10
Element 18
Element 20
Element 22
Element 27
Element 28
Element 33
Element 36
Element 38
Element 39
Element 40
Element 42
Element 48
Element 74
Element 78
Element 82
Element 84
Element 85
Element 86
Element 112
Element 113
Add the Copyright and your License Number for the tube
Resize to your liking and save as PNG
This tutorial was created on October 18,2014 by Rhonda
Any resemblance to another Tag or Tutorial is purely coincidental
ScrapsNCompany hosted their annual Halloween Blog Train with designers and artists offering some awesome items
If you haven't checked them out you are missing out some goodies
You can find the Blog Train HERE
Please leave some love when downloading


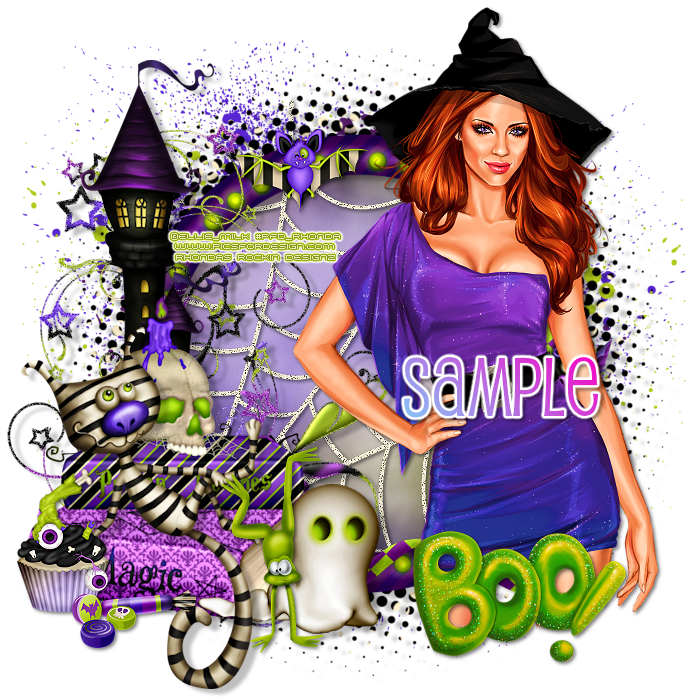
Friday, October 17, 2014

This tutorial is written for those with knowledge of PSP
Supplies Needed:
Tube of choice: I'm using the wonderful art work of Danny Lee
You must obtain a license to use his art at S&Co HERE
PTU Scrap Kit from Designz by Sue called "ABRACADABRA" HERE
Resize elements to your liking
This is a very quick and easy tutorial
Open element 51 & place in center of tag
Grab the magic wand & click inside frame
Selections modify expand by 10
Open paper 8 and paste as new layer
Move paper under frame
I used the following:
Element 3
Element 8
Element 10
Element 20
Element 23
Element 27
Element 28
Element 46
Element 58
Add the Copyright and your License Number for the tube
Resize to your liking and save as PNG
This tutorial was created on October 17,2014 by Rhonda
Any resemblance to another Tag or Tutorial is purely coincidental

This tutorial is written for those with knowledge of PSP
Supplies Needed:
Tube of choice: I'm using the wonderful art work of Keith Garvey
You can find his art HERE
FTU Scrap Kit by MMeliCrea Designz HERE
This is a facebook freebie
Mask of choice
Don't forget to leave a thank you when downloading
Open canvas size 700x700
Open frame 1 resize and place in center
Open frame 3 resize and place on top of frame 1
Click inside frame with magic wand
Selections modify expand by 8
Open new layer and move under frame
Open paper 5 and paste into selections
Select none
I used the following:
Element 12
Element 13
Element 16
Element 17
Element 20
Element 26
Element 31
Element 48
Element 52
Element 57
Element 58
Element 60
Element 65
Open paper 3 & apply mask of choice
Add the Copyright and your License Number for the tube
Resize to your liking and save as PNG
This tutorial was created on October 17,2014 by Rhonda
Any resemblance to another Tag or Tutorial is purely coincidental
Wednesday, October 15, 2014

This tutorial is written for those with knowledge of PSP
Supplies Needed:
No tube needed for this tutorial
FTU Scrap Kit by Jen from Sweet Temptations called "Jeepers Creepers"
You can download this awesome kit HERE
Template by Freebie Friends HERE
Mask of choice
Don't forget to leave a thank you when downloading
Open template - Shift D to duplicate then close out original
Canvas size 700x700
delete copyright
paste a paper of choice from the kit - I used paper6
selection invert delete
select none delete the original
I also added a border with noise
paste a paper of choice from the kit - I used paper1
selection invert delete
select none delete the original
paste a paper of choice from the kit - I used paper4
selection invert delete
select none delete the original
paste a gradient of choice
selection invert delete
select none delete the original
I used a gradient with Filter Unliminted texture
I used the following:
BFly 1
BFly 2
Boo
Cat
Frog
Goblet 2
Hat
Pumpkin 1
Pup
Open paper 2 & apply mask
Add the Copyright and your License Number for the tube
Resize to your liking and save as PNG
This tutorial was created on October 15,2014 by Rhonda
Any resemblance to another Tag or Tutorial is purely coincidental
Tuesday, October 14, 2014

This tutorial is written for those with knowledge of PSP
Supplies Needed:
Tube of choice: I'm using the wonderful art work of Misticheskaya
You can purchase his tubes from PFD HERE
PTU kit by Jen from Sweet Temptations called "Halloween Boo-gie"
You can purchase this kit HERE
Cluster is included in kit
Mask of choice
Xero Porcelin
Just place your elements where you want them
Open cluster 1 from kit - resize to your liking
Here are the ones I used:
Cupcake 2
Kitty
Open paper 1 & apply mask of choice
Add the Copyright and your License Number for the tube
Resize to your liking and save as PNG
This tutorial was created on October 14,2014 by Rhonda
Any resemblance to another Tag or Tutorial is purely coincidental
Monday, October 13, 2014

This tutorial is written for those with knowledge of PSP
Supplies Needed:
Tube of choice: I'm using the wonderful art work of Di-Halim
You must obtain a license to use this art at S&Co HERE
PTU Scrap Kit from Bibi called "Fall Cutie"
You an purchase this awesome kit at S&Co HERE
Template #211 from Toxic Desirez HERE
Open template - Shift D to duplicate then close out original
Resize all layers 85%
Increase canvas to 700x700
Delete copyright & heart layers
paste a paper of choice from the kit - I used paper7
selection invert delete
select none delete the original
paste a paper of choice from the kit - I used paper3
selection invert delete
select none delete the original
paste a paper of choice from the kit - I used paper5
selection invert delete
select none delete the original
paste a paper of choice from the kit - I used paper8
selection invert delete
select none delete the original
paste a paper of choice from the kit - I used paper6
selection invert delete
select none delete the original
paste a paper of choice from the kit - I used paper2
selection invert delete
select none delete the original
add new layer - Open element 129 and paste into selection
select none
I used the following:
Element 6
Element 7
Element 12
Element 18
Element 34
Element 41
Element 42
Element 47
Element 52
Element 72
Element 77
Element 80
Element 88
Element 92
Element 97
Element 99
Element 112
Element 115
Element 118
Element 124
Add the Copyright and your License Number for the tube
Resize to your liking and save as PNG
This tutorial was created on October 13,2014 by Rhonda
Any resemblance to another Tag or Tutorial is purely coincidental
Sunday, October 12, 2014

This tutorial is written for those with knowledge of PSP
Supplies Needed:
No artist tube used
FTU Scrap Kit by Kittz Kreationz HERE
Mask of choice
Open blank canvas 700x700
Open elements B59 and place in center
Grab the magic wand and click inside frame
Selections modify expand by 10
Add new layer
Open paper 9
Paste paper into selections
Selections none
Move paper under frame
B5
B11
B13
B16
B18
B22
B29
B30
B33
B40
B41
B48
B51
Open paper of choice & apply mask
Add the Copyright and your License Number for the tube
Resize to your liking and save as PNG
This tutorial was created on October 12,2014 by Rhonda
Any resemblance to another Tag or Tutorial is purely coincidental


Saturday, October 11, 2014

This tutorial is written for those with knowledge of PSP
Supplies Needed:
Tube of choice: Im using the wonderful art work of VeryMany
Which you must obtain a license to use HERE
PTU Scrap Kit by Chachaz Creations called Halloween Night
You an purchase this awesome kit at S&CO HERE
Template by StyleLicious HERE
Mask #0904 by Vix HERE
Mask is part of the set that is 416 to 426
Don't forget to leave a thank you when downloading
Open template - Shift D to duplicate then close out original
Canvas size 700x700
delete copyright & wordart
paste a paper of choice from the kit - I used paper6
selection invert delete
select none delete the original
paste a paper of choice from the kit - I used paper2
selection invert delete
select none delete the original
paste a paper of choice from the kit - I used paper3
selection invert delete
select none delete the original
paste a paper of choice from the kit - I used paper4
selection invert delete
select none delete the original
paste a paper of choice from the kit - I used paper2
selection invert delete
select none delete the original
I used the following:
Element 3
Element 5
Element 6
Element 13
Element 16
Element 27
Element 29
Element 35
Element 44
Element 48
Element 49
Element 50
Element 53
Element 54
Element 58
Element 60
Open paper of choice and apply mask
Add the Copyright and your License Number for the tube
Resize to your liking and save as PNG
This tutorial was created on October 11,2014 by Rhonda
Any resemblance to another Tag or Tutorial is purely coincidental
Thursday, October 9, 2014


These tutorials are exclusive to TTL forum.

This tutorial is written for those with knowledge of PSP
Supplies Needed:
Tube of choice: I'm using the wonderful art work of Zlata
You must obtain a license to use HERE
PTU Scrap Kit from Kissing Kate called Dark and Luxurious HERE
This kit matches the tube!!!!!
Mask by Kisses N Dreams HERE
Resize elements to your liking
This is a very quick and easy tutorial
Open blank canvas 700x700
Open frame 3 & place in center of tag
Grab the magic wand & click inside frame
Selections modify expand by 10
Open paper 4 and paste as new layer
Selections invert delete
Move paper under frame
I used the following:
Element 1
Element 2
Element 3
Element 4
Element 14
Element 16
Element 24
Element 25
Element 27
Element 30
Element 39
Element 66
Element 69
Open paper of choice and apply mask
Add the Copyright and your License Number for the tube
Resize to your liking and save as PNG
This tutorial was created on October 9,2014 by Rhonda
Any resemblance to another Tag or Tutorial is purely coincidental
Saturday, October 4, 2014

This tutorial is written for those with knowledge of PSP
Supplies Needed:
Tube of choice: I'm using the wonderful art work of Toriya
You must obtain a license to use his art at S&Co HERE
Matching PTU Scrapkit by Designs by Joan HERE
Mask of choice
This is a very quick and easy tutorial
Open blank canvas 700x700
Open element 35 and place in center
Grab the magic wand & click inside frame
Selections modify expand by 10
Add new layer under frame
Open paper 1 & paste into selections
I used:
Element 2
Element 3
Element 4
Element 5
Element 14
Element 37
Element 46
Element 48
Element 75
Element 78
Element 80
Element 115
Open paper 6 & apply mask of choice
Add the Copyright and your License Number for the tube
Resize to your liking and save as PNG
This tutorial was created on October 4,2014 by Rhonda
Any resemblance to another Tag or Tutorial is purely coincidental

This tutorial is written for those with knowledge of PSP
Supplies Needed:
Tube of choice: I'm using the wonderful art work of GraphFreaks
You must obtain a license to use this art at S&Co HERE
PTU Scrap Kit from Bibi called "BCA Babe"
You an purchase this awesome kit at S&Co HERE
Template by Tamie HERE
Mask of choice
Open template - Shift D to duplicate then close out original
Resize template by 84% all layers
Increase canvas size to 700x700
delete copyright,wordart and rasters 5
paste a paper of choice from the kit - I used paper3
selection invert delete
select none delete the original
paste a paper of choice from the kit - I used paper4
selection invert delete
select none delete the original
paste a paper of choice from the kit - I used paper9
selection invert delete
select none delete the original
paste a paper of choice from the kit - I used paper19
selection invert delete
select none delete the original
I used the following:
Element 4
Element 5
Element 16
Element 35
Element 37
Element 39
Element 40
Element 46
Element 47
Element 53
Element 77
Element 82
Element 89
Element 100
Element 101
Element 104
Element 116
Element 117
Element 125
Element 128
Open paper 15 & apply mask of choice
Add the Copyright and your License Number for the tube
Resize to your liking and save as PNG
This tutorial was created on October 4,2014 by Rhonda
Any resemblance to another Tag or Tutorial is purely coincidental
Subscribe to:
Posts
(Atom)
Grab My Blinkie

I CT For


Blogs I Visit


